Captioning for YouTube in Adobe Premiere Pro
December 29, 2023 · An exhaustive guide to creating captions/subtitles for YouTube videos in Adobe Premiere Pro with the help of Aegisub.
If you've ever tried to do anything remotely fancy with subtitles in Premiere Pro, such as formatting your text or displaying multiple subtitles at once, you've probably figured out that none of your fancy features work on YouTube. Your second subtitle track is nowhere to be seen and your italics all look <i>like this.</i> What's happening!?
The answer is complicated. The main problem is that Premiere Pro only supports exporting in the SubRip (.srt) format, a basic format which lacks in text formatting features. Although Premiere Pro does support exporting some formatting information, YouTube lacks support for processing it. Additionally, Premiere Pro assumes all your subtitle tracks represent different languages, ignoring the modern use cases of overlapping speaker subtitles and music notifications, and thus does not allow you to merge subtitle tracks in your export.
The TL;DR of my solution is to simply import the subtitles into a more capable subtitling software, Aegisub. While you could fully write your subtitles in Aegisub, I personally find a lot of value in having subtitles directly on my timeline, not to mention the time-saver that is auto-transcription.
So, without further ado, here is my exhaustive tutorial from zero to fully stylized YouTube subtitles.
Creating Captions
- Enable Window -> Captions and Window -> Essential Graphics
- For scripted content, select Import captions from file and upload your transcript. Otherwise, click Create captions from transcript to auto-transcribe the video. Enable speaker labels if appropriate and click OK then wait.
- Refine caption contents by double clicking on them in the Captions window, or in the program monitor.
- Use the Essential Graphics window to apply formatting changes. Note that doing so will complicate the export process, and only a small selection of changes will work (namely Faux Italics, Faux Bold, and Fill Color). To apply changes to individual characters, select the text you want to edit in the program monitor, not the Captions window.
- Refine the durations of captions on your timeline like any other source.
- If you wish to have multiple captions active at once (i.e. for overlapping speakers, or a music indicator, etc.) then you must create a new subtitle track by right clicking on Subtitle on your timeline and clicking Add track. Note again that this will complicate the export process.
Exporting
Basic
If your video just has a single caption track without text formatting, then on the Export tab you just have to enable Captions and set Export Options to Create Sidecar File. That's it, you're done!
- Follow the Basic steps
- If you used text formatting, then ensure Include SRT Styling is enabled on the Export tab.
- To export additional subtitle tracks, make one visible on your timeline then go into the Captions window and select Hamburger Menu -> Export -> Export to SRT file...
- Download Aegisub
- Drag and drop one of the exported subtitle tracks onto Aegisub
- Convert the track to ASS format with File -> Save Subtitles as...
- If you used multiple subtitle tracks:
- Drag and drop one of the other exported subtitle tracks onto Aegisub, select every line, and press Ctrl+C
- Return to the .ass file and press Ctrl+V (and Ctrl+S to save)
- Repeat as necessary with other subtitle tracks
- [Here I originally suggested exporting to .stl but it does not seem to be as well-supported as I thought, so you'll need to follow the Advanced section instead for now.]
Advanced
On top of basic text formatting, the advanced export (for YouTube only!) allows you to fine-tune the visual display of the subtitles (font/background/shadow/glow), write karaoke text, transparent text, etc. View the full list of supported features here.
- Follow the Intermediate steps (skipping the .stl export)
- Download and open YTSubConverter
- Note that the app will try to mimic the Aegisub preview as closely as possible, meaning by default it will not have any background like standard YouTube subtitles. If you want to add a transparent background:
- Go to Subtitle -> Style Manager
- Select Default on the right and click Edit
- Enable Opaque box and set Shadow to 0
- Click OK and Close
- Go to Automation -> Automation...
- Download this script (click Raw and then right click -> Save Page As...)
- In Aegisub, click Add, then select the script
- Click Close
- Select all lines of text then click Automation -> Add BG transparency
- Remember Ctrl+S to save!
- Drag and drop the .ass file onto the app and click Convert
Aegisub Tips
Styles
Styles are used to apply consistent formatting changes across like lines of text, such as changing the font, color, position on the screen, margins, etc. Styles are managed under Subtitle -> Styles Manager.... The section on the right contains the styles and settings for your current subtitle file. You can click New to create a new one or Edit to edit an existing one.
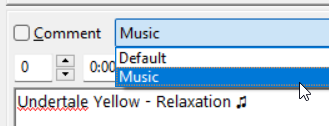
To apply a style, select it in the style dropdown above the text field (example). This can be done with multiple selected lines to change them all at once.
Uploading to YouTube
- Open YouTube Studio and select the video to edit
- Go to the Subtitles tab on the left
- Click ✏️ Add in the Subtitles column next to the appropriate language
- Click Upload file and press Continue
- Select your subtitle file (.ytt / .srt)
- Click Publish